


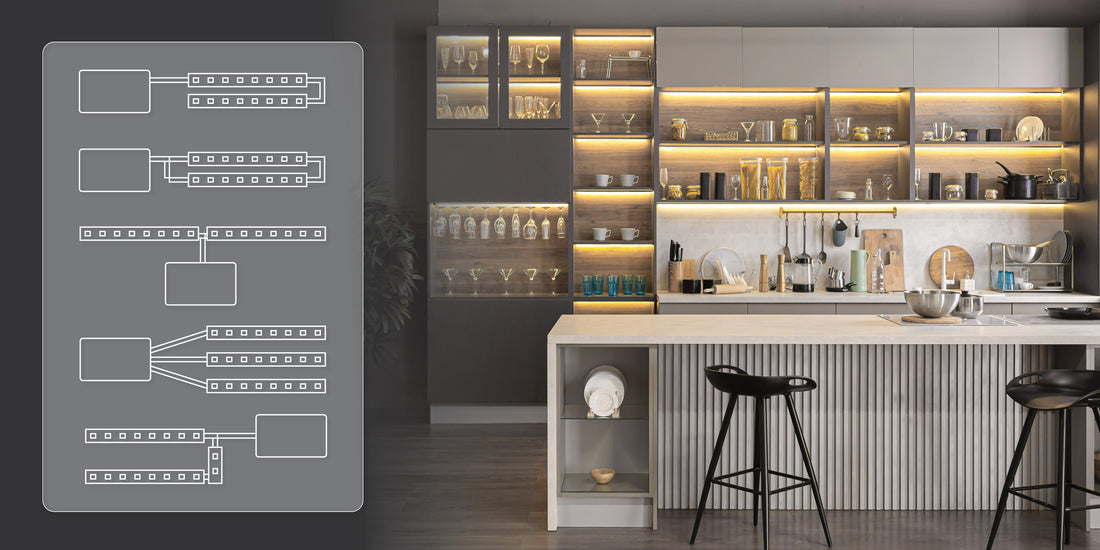
Understanding LED Strip Light Configurations
Proper planning is key to any installation of LED strip lights. Pre-planning your LED lighting configuration and understanding the capabilities and limitations of your LED tape light will aid in avoiding problems such as power supply overload, voltage drop, and polarity issues. The four major LED tape light configurations are straight run, array, center-feed, and loop-back. Understanding the pros and cons of each configuration, as well as their most used applications is the first step in a successful lighting set-up.
Avoiding LED Light Installation Mistakes
The most common problems that you can run into when installing LED light strips are power supply overload, voltage drop, and polarity swap. If the total watts of LED lighting exceed the total watts of the power supply they are connected to, the lights will flash, signaling that the LED driver is overloaded. Always reference Wattage Charts to calculate the total wattage of your lights.
One long run of LED lighting will be more efficient than multiple short runs. But if your runs are too long you will encounter our second problem; voltage drop. Voltage drop is a gradual decrease in voltage and will negatively affect LED light color and brightness. Reference Wattage Charts to find recommended light run lengths, to avoid voltage drop.

If polarity is switched or swapped (+/- instead of +/+ and -/-; or color markings are mismatched) then your lights will not turn on at all, or cut portions may have unexpected performance or mismatched color. To avoid finding any of these problems after installation, tape strips to installation surface with painters tape and test all LED lighting before permanently installing.

Straight Run LED Light Installations
The most common configuration for under cabinet LED lighting installationsThe simplest LED tape light configuration is a Straight Run. Most kitchen and under cabinet LED lighting installations can be handled with a Straight Run configuration. Only one end of the LED strip is powered. Multiple strips can be connected in a series for a continuous run. Straight Runs are limited by the shorter lengths of LED tape that can be run due to voltage drop (compared to center-feed/loop back). LEDs farther away from the LED driver may appear dimmer due to voltage drop, especially if longer wires are used in between to connect strips. Use our Voltage Drop Calculator to ensure you will avoid voltage drop.

Center Feed and Loop Back LED Light Installations
Common for large strip light installations, like room perimeter, porch, large accents, and cove lightingTo avoid voltage drop in large LED lighting installations such as perimeter lighting, ceiling accents, floor accents, porches, coves, etc. you will want to use a Center Feed or Loop Back configuration. A Center Feed is two straight runs powered by one LED power supply. The easiest way to do so would be to have each run’s positive and negative wires run into the same positive and negative output on the power supply or controller. Both runs are equal length and only one end of each run is powered. Center feeds are useful when you need to light a large area with one power supply.

A Loop Back configuration is one unbroken run of tape light with both ends of the run being powered. The lead wire connected to the tail of the run connects into the same terminal of the LED driver or controller that the lead wire at the beginning of the run connects to. Loop Backs make the most sense for room perimeter tray ceiling, cove lighting, and porches.

Array LED Light Installations
Configuration for connecting various lengths or multiple runs of LED strip lightsIf you need to light multiple locations with different lengths of LED tape light that run back to a single power supply, you should use an Array lighting configuration. An array uses two or more legs of various lengths wired to a power supply in a parallel connection. Only one end of each run is powered. You will need to calculate total wattage used in an array to guard against overloading the power supply. The Array is the least efficient configuration but is useful when wire is accessible at multiple locations.

Installing LED Strip Lights on Shelves, Stairs, Inside Cabinets, etc.
When you need to light each shelf or each stair, there are a couple of installation options that make use of different lighting configurations.
One option is to have a straight run that is in an “S” configuration and snakes up the shelves/stairs. Each strip in the series is cut and connected to the next until the last strip. Only one end of the LED strip is powered. Multiple strips can be connected in a series for a continuous run.

Another option is to make use of an array configuration and have multiple strips that run back to the same power supply like an “F”. Only one end of each run is powered and each run is wired to a single power supply in a parallel connection. The wattage of each light strip would have to be calculated and added together to avoid power supply overload.
For more helpful information on mounting LED strip lights, check out our LED Strip Light Installation Tips blog article.
